
Postach.io: Creating a Favicon in Postach.io
NOTE: This was originally posted on biggreenapp.com and has been migrated here.
Although this post explains how to aid a favicon to your postach.io site, this could be helpful if you need to dig into your code on some other platform as well.
“How do add an icon logo to the address bar using postach.io? that would make a nice post lol.”
A BigGreenApp.com reader
You ask, I listen.
Let’s make your favicon!
Using a Favicon With Your Postach.io Site
This is a pretty easy one, and typical for any web development if you’ve done anything like that before.
BUT… if not? Let’s do it!
What is a Favicon?
Favicons used to be much more of a showpiece and differentiation between quality and home-made websites.
They don’t seem to matter as much these days, but they still add nice polish to your website.
These images are the branding for your site in tabs and bookmarks. It’s what you see when you are typing a url or thumbing through your open sites on your mobile device.

Adding a favicon to your website transforms your site from a page on a platform to a site of your own, and it isn’t difficult to create, but might take a bit of work.
Step One: You have to have a paid Postach.io account
We’re going to need to edit the template so you cannot get away with free site for this.
I explained a bit more about the differences between free and premium in a recent blog post, but if you are serious about your site, this is a pretty minimal investment. If you can part with $5 for a month, give it a try and cancel if you need to a month later.
Step Two: You need your image
Historically, this was a small image that was only a small amount of pixels wide in a special icon format, but these days you can get away with just one image that is quite a bit larger — allowing you to increase your resolution and add quite a bit of polish to your branding.
I plan to add another post in the future to talk a bit more about my logo. I created it completely on my iPad, and the same is true with the favicon, but my favicon is a 192×192 PNG file with a transparent background. Feel free to take a look at it here. Download it and use it as your template. That’s fine with me.

If you want to take the traditional approach and create a .ico for your favicon, I’d suggest creating a square image like mine then uploading it to a free online image converter like favicon.io which will kick out versions of your image for a bunch of uses.
Step Three: You need to find a location to host your image
Another upcoming post I plan to share is how to host images on your Postach.io site that will allow you to grab the web address (URL) of the image to use in your content or as elements on your website. This will also allow you to wrap text around images, along with more complex formatting you cannot do by default with Evernote.
Basically, you can use Postach.io as a file server, but that’s a post for another day. If you have a way to host an image and get the URL, you are on your way.
hint: if you use the image somewhere on your site, you can right-click on it in your browser, open the image in a new tab, and copy the URL. That’s what you need. 🙂
Step Four: It’s just one line of code
Customize your theme and find the last line of the <head> section of your template.
Mine ends on line 42. (without this line, it would be line 41).
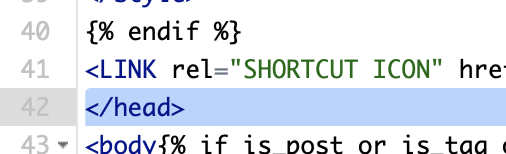
On the line before you see </head>, paste the following:
<LINK rel="SHORTCUT ICON" href="URL of your image">
Save and you are set!
Share your site with your awesome favicon in the comments below.
I hope this helps.
Photo created and used with permission by Craiyon.